14 April 2017
Editing Sitecore Azure ARM Templates - Part 1 - Introduction

Introduction
With the release of Sitecore 8.2 Update-1 support for Azure WebApps was introduced. The recommended deployment strategy was to make use of Azure Resource Management (ARM) templates and Sitecore released a series of these ARM Templates which people could use as a base for their deployments. At the Melbourne User Group in February I presented on this topic and I've finally found some time to translate that presentation into a series of blog posts.
Since support for WebApps was introduced and the ARM templates were released I had been trying to come up with a small introduction type project to get up to speed on how the ARM templates function. After a bit of thinking I decided to work on the following simple example.
Switching the Session Provider
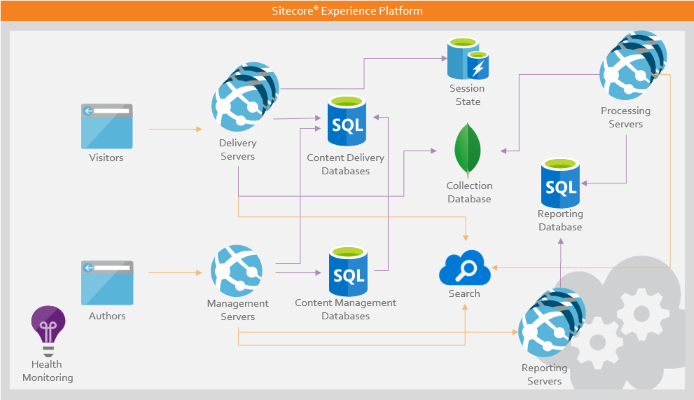
The default ARM template released by Sitecore setup the following architecture in Azure:
I decided to edit the base ARM templates to create a slightly different architecture, instead of using Redis for the session technology I would change it over to use MongoDB. This change would adjust the target architecture to instead be:

Implementing this change would involve changing the WebDeploy package to now be using MongoDB for its session technology and also editing the ARM templates to pass in an extra parameter for the session database connection string.
Mongo Setup
The ARM templates provided by Sitecore require you to "roll your own" Mongo DB setup, this means that you're responsible for setting up the various Mongo databases you require then you simple enter the connection strings as parameters later on. To keep this as simple as possible I'm using MLab's Sandbox offering, ideal for development and testing activities. Counting the default four Sitecore Mongo databases and the new session database I'm introducing that means creating the following 5 databases:
- melb-user-group-analytics
- melb-user-group-tracking-contact
- melb-user-group-tracking-history
- melb-user-group-tracking-live
- melb-user-group-sesssion
After creating each of the databases you have to create a user for each, then you can build the connection strings. After this you have everything you need to start working with the ARM templates & WebDeploy packages themselves.
I will continue to go into this topic throughout this series, next up Editing Sitecore Azure ARM Templates - Part 2 - Building the WebDeploy package