3 March 2019
Building an Ubuntu VM in Azure running Solr, with a trusted LetsEncrypt certificate - Part 2

So this is part 2 in my series walking you through how to setup an Ubuntu VM in Azure running Solr secured using LetsEncrypt. In the first part we used the Azure CLI to create the VM, then opened an SSH connection to server to test it had completed successfully. In this post we're going to cover how to install Java & Solr on the VM.
You can find the other posts in this series here:
- Part 1: Creating the VM in Azure
- Part 2: Installing Java & Solr
- Part 3: Setting up the LetsEncrypt cert in Solr
- Part 4: Setting up the Sitecore indexes
Installing Java
So before we can setup Solr we first need to install Java, as thats a requirement for Solr. It turns out that to install Java on Ubuntu is really simple and just like in my previous post can be completed in a couple of commands. First we run these two commands:
sudo add-apt-repository ppa:webupd8team/java
sudo apt update
What we've done here is to add the Java repository to our system, so that the package manager knows where to download it from. Then we update the package manager to get it to read the new repository.
Next we run:
sudo apt install oracle-java8-installer
This will actually start the process of installing Java. During this process you'll also have to confirm the following two dialogs.
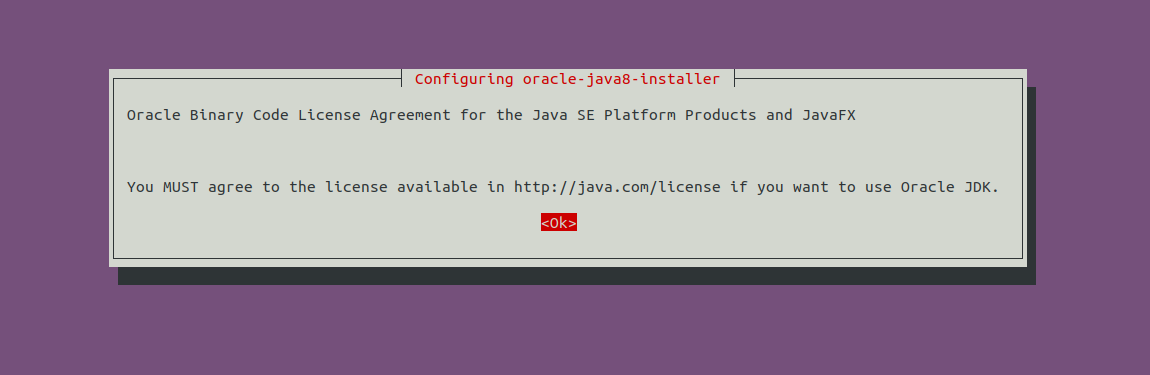

These prompts ask us to confirm that we accept the Java License. Once we go past them Java will then install. The final thing we can do is to test that the installation proceeded successfully with the following command:
javac -version
If everything has worked and the installation succeeded then you should see the Java version printed out, in my case this looked like:
javac 1.8.0_201
And that's it, three commands and we now have Java installed and running on the the VM. Now its time to setup Solr.
Installing Solr
Now I'm setting up an instance of Sitecore 9.1, in preparation for the release of Sitecore Experience Commerce 9.1 later this month, that means that I need to setup Solr 7.2.1. The first thing we need to do is to download the archive, and we're going to store that in the /opt folder with the following commands:
cd /opt
sudo wget http://archive.apache.org/dist/lucene/solr/7.2.1/solr-7.2.1.tgz
Next we're going to extract the archive and run the installer using the following commands
sudo tar xzf solr-7.2.1.tgz solr-7.2.1/bin/install_solr_service.sh --strip-components=2
sudo bash ./install_solr_service.sh solr-7.2.1.tgz
Now what we need to do is to run the Solr service and check its status
sudo service solr start
sudo service solr status
Now we have Solr installed and the service is running, the final thing we need to do is to allow traffic on port 8983 to access the VM.
Configuring the Network Security Group
So to open the port on the Network Security Group we can once more return the Azure CLI that we used in the previous post. We're going to execute the following command to achieve this:
az network nsg rule create \
  -g SitecoreExperienceCommerce \
  -n "Allow Solr Port" \
  --nsg-name Ubuntu-SolrNSG \
  --access Allow \
  --direction Inbound \
  --priority 100 \
  --destination-port-ranges 8983
So lets take a look at this command line by line
az network nsg rule create: This line is pretty straight forward, we're executing the Azure CLI and telling it we want to create a new Network Security Group Rule.-g SitecoreExperienceCommerce: Here we're specifying the Azure Resource Group that was created in the previous post.-n "Allow Solr Port": Now we give the rule a friendly name so we'll know what its for if we look back at it in the future.--nsg-name Ubuntu-SolrNSG: This parameter lets us specify the name of the Network Security Group that we want to add this rule to. Note that the Network Security Group is created for us automatically when we created the VM in the previous post.--access Allow: Here we say that this is an allow rule that we're creating, i.e. you can choose to allow or deny access, in our case we want to let traffic through on that port--direction Inbound: States that this rule applies to traffic attempting to access the VM, instead of traffic leaving the VM.--priority 100: The priortity value allows you set which rules have precidence, in Azure the lower priority value has priority.--destination-port-ranges 8983: Here we're setting which port we want to enable, in this case the default Solr port of 8983.
After the command completes we get a successful response back which looks like the following:
{
  "access": "Allow",
  "description": null,
  "destinationAddressPrefix": "*",
  "destinationAddressPrefixes": [],
  "destinationApplicationSecurityGroups": null,
  "destinationPortRange": "8983",
  "destinationPortRanges": [],
  "direction": "Inbound",
  "etag": "W/\"XXXX\"",
  "id": "/subscriptions/XXXXX/resourceGroups/SitecoreExperienceCommerce/providers/Microsoft.Network/networkSecurityGroups/Ubuntu-SolrNSG/securityRules/Allow Solr Port",
  "name": "Allow Solr Port",
  "priority": 100,
  "protocol": "*",
  "provisioningState": "Succeeded",
  "resourceGroup": "SitecoreExperienceCommerce",
  "sourceAddressPrefix": "*",
  "sourceAddressPrefixes": [],
  "sourceApplicationSecurityGroups": null,
  "sourcePortRange": "*",
  "sourcePortRanges": [],
  "type": "Microsoft.Network/networkSecurityGroups/securityRules"
}
Now we can use open our browser and use the domain we setup in part 1 with port 8983 and we're presented with the Solr dashboard!
Of course it's currently only running over HTTP, so the next thing we need to do is make it available over HTTPS, which is what we'll cover in the next part of this series.
Thanks for reading.