11 March 2019
Building an Ubuntu VM in Azure running Solr, with a trusted LetsEncrypt certificate - Part 4

So this is the fourth and final part in my series walking you through how to setup an Ubuntu VM in Azure running Solr secured using LetsEncrypt. In the first three parts we used the Azure CLI to create the VM, we installed Java and Solr then finally we secured the solr instance using a certificate from the awesome LetsEncrypt service. In this post we're going to finish setting the service up by creating the cores that we need to run Sitecore.
You can find the other posts in this series here:
- Part 1: Creating the VM in Azure
- Part 2: Installing Java & Solr
- Part 3: Setting up the LetsEncrypt cert in Solr
- Part 4: Setting up the Sitecore indexes
Create the Solr cores
So for a Sitecore Experience Commerce instance we need to create the following cores:
- CatalogItemsScope
- OrdersScope
- CustomersScope
- sitecore_core_index
- sitecore_fxm_master_index
- sitecore_fxm_web_index
- sitecore_marketing_asset_index_master
- sitecore_marketing_asset_index_web
- sitecore_marketingdefinitions_master
- sitecore_marketingdefinitions_web
- sitecore_master_index
- sitecore_suggested_test_index
- sitecore_sxa_master_index
- sitecore_sxa_web_index
- sitecore_testing_index
- sitecore_web_index
- xdb
- xdb_rebuild
Now before we can create the indexes, we need to follow the guide here, which tells us how to setup the index definitions ready for Sitecore to interact with them. This basically involves a few tasks that we need to perform.
First of all we're going to follow the guide linked above to edit the example index definition to a format Sitecore can use. We're going to use the default nano editor like last time, we open the default index definition with the following command:
sudo nano /opt/solr/server/solr/configsets/_default/managed-schema
Once open we make the two changes detailed in the guide above, we update the id of uniqueKey field and also add the new _uniqueid field. Once this is complete we can use Alt-X to exit, making sure that we select to save the changes.
Now we've updated the default index definition we need to duplicate this definition for each of the indexes that we want to create, and we do this with the following command:
sudo cp -r /opt/solr/server/solr/configsets/_default /var/solr/data/ENTER_INDEX_NAME_HERE
What we're doing here is copying the _default index definition to the /var/solr/data/ folder where Solr reads its index data from. You'll have to run this command for each index, replaceing the ENTER_INDEX_NAME_HERE at the end with the name of index you're creating.
Now we've created all of the index definition files on disk, however if you try to add them into Solr you will receive a permissions error as the user that solr is running as doesn't currently have permission to edit those files. To grant that permission we change the folders to be owned by the solr user with the following command:
sudo chown -R solr /var/solr/data/ENTER_INDEX_NAME_HERE
Once more you will need to run this command for each of the indexes and replace the ENTER_INDEX_NAME_HERE parameter with the name of the index as you execute the command for each one.
Add the cores to Solr
Now we have the index definitions created on disk and ready to be used by Solr, so next we need to register the cores in the Solr admin panel. We access the Solr admin page over our secured URL that we setup in the previous steps, you then use the left hand menu and select Core Admin, it is in here where we'll register all of our indexes.
You select the Add Core button and then populated the first two fields with the name of the index you want to create, for example when creating the sitecore_master_index you would populate it like so:
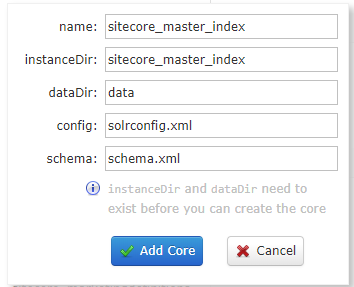
You can the hit the Add Core button and it will be configured in Solr. You have to repeat this process for all of the cores that we created above and then you're finished, we have Solr configured and ready for Sitecore to interact with it!
Rebuilding the Indexes
Solr is now configured and ready to accept requests from Sitecore, so the next thing we need to do is to load up the Control Panel in Sitecore. The final action that we need to complete before we can rebuild the indexes is to Populate Solr Managed Schema. This will ensure that the index definitions are configured and ready to accept Sitecore data. Once this has been complete we can perform an index rebuild and our Sitecore data will be included in the indexes and ready to be searched!
Conclusion
So this marks the end of this series. We've performed a few different tasks along the way including building a brand new VM in Azure, installing & configuring Solr, securing the instance for HTTPS communication, then finally configuring the instance ready to receive data from Sitecore. Despite the amount of tasks we've completed it has almost exclusively been performed on the command line and I love how that demonstrates the power you have doing DevOps today with the Azure CLI, it also demonstrates how simple it is to get Solr running on a Linux instance. The other part I really like in this is that we used the amazing LetsEncrypt service to use a genuine certificate to secure communication with this Solr instance, no more self-signed certificates for me!
I hope you've enjoyed the series and thanks for reading as always.